Adobe Lightroom 2020 Full Tutorial.How To Use
Adobe Lightroom Mobile 2020 Full Tutorial In One.
So, let's Time Out.. Suryansh Yadav
here and welcome to my channel! So, mostly of my photos that I'm uploading I'm editing it using my mobile phone So, I'm thinking on how I can be productive and release my photos on time.
No... I didn't make it on time! Heheh! And, all of my photos that I uploading in social media are edited using my mobile phone. And, if you're new to my channel...hope you subscribe. Of course, if we're going to edit photos... ...we need a mobile application. So, the application that we will use is Adobe Lightroom Mobile. So, for those who haven't that App yet.. ..just upload it via Play Store if you're Android user.. ..and for Apple user,
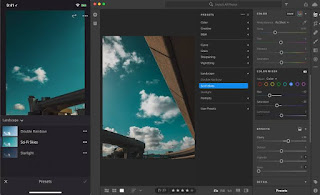
I think it's in App Store. Just go to Play Store. Then, type in Lightroom. It will just appear like this. But, in my case I already download it. So, for those who haven't download it yet. Just download it and install to your mobile phone. Since I already have it. Let's me show you the app. This is how it looks - Lightroom. Just click it to open. First, let's import the photo we want to edit. Look at the plus sign below.. ..beside the camera icon. Just click it to import the photo. Since, my photos are already here. I'll just look for a photo that I want to edit. So, I'll be selecting a photo... ...from my last photo shoot.
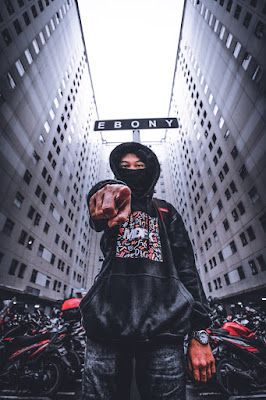
This is my favorite shot. And, I want to edit this now. So, when I do my editing stuff. The first thing I do is.. I go to crop. In crop... Of course, I want my picture be aligned. So, I click the straighten. So it will automatically align. When you click it. It's automatic. Do a little adjustment. So that, other parts you still want to see won't be cropped. That's it. This is okay now for me. Then, click the CHECK above. After that, I go immediately to color. In color... First, I adjust the one that will set the mood of my photo. This one seems like Van Helsing.
It's steam-punked theme. So, I'll lower down the temperature. Because, I want her look vampirish. And then, I'll adjust the tint. To make it a little bit more violet. So, next I'll be adjusting the vibrance. Because, I want my photo be colorful. So, I always adjust the vibrance to high. Because, I want the color of my photo be more vibrant. I'll also add a little saturation. Just a little. Then, after that.. Since, I'm done with the color. I also want to edit the individual colors. So, I'll go to mix. Then, I'll edit the color need to enhance. So, here. I want to adjust the violet. Enhance it just a bit. And then, let's add a little luminance. And then, I want to follow red to enhance her lips also. Then, let's add a little luminance. In photos, once there's a color blue..
I normally decrease that color. Because, what I want is... almost no blue and I'll make it grayish for cinematic effect So, I'll minimize the saturation I want it to be grayish. So, it's gray actually - the background. Then, let's adjust a bit more in hue and in luminance. It's now okay for me. It's already gray. And, it elevates my subject. So, the next I'll gonna do is her skin. I want it to adjust. So, the orange is the nearest. Since I want to achieve a vampirish look. I'm lowering the color to make her pale a little. Then, I'll glow her skin a little in luminance. That's it. For this, I usually adjust.. the blue, which is important for me and the orange. Since, there are red and violet that I want to highlight. I adjusted it. So, just press done. After that, I also edit effects. In effects, I usually adjust the Dehaze. So, if you will notice the colors will be elevated... and it will have a little drama. In clarity.. I usually lowering it down to make it not too strong.
I'm adjusting it a little high or low. Depending on the outcome to my photo. Here. I'm lowering it into negative Three. To make it non-eye irritant - strong. So, I adjust the texture sometimes. Maybe, let's increase it a bit.. ..or maybe let stay it in zero. Now, I'm done with the Effects. Let's move on now to Detail. In details, it's actually sharp already if you will notice. But, I still add more sharpness because... I'll be adding Masking and Noise Reduction. To make the outcome smooth. So, it's sharp and smooth too. So, that will be the outcome for me.
I want to add more details. It's sharpness. That's mostly I'm adjusting. Then, after that I go to... Light In Light, I usually lowering the Highlights To elevate more its details. Then, increase a little Shadows. To have a drama effect. And, then little of Blacks. So, that's the outcome - slightly vivid colors. Then, after that. Of course, when I'm not using strobes during my photo shoots and still I want my photos be dramatic. I do use Selective edits. This is Masking. Wherein, you can edit or adjust any specific area only. So, because of that. I want to put in drama on the photo. For Selective edits, select the circle above then, place it on the specific area you want to edit usually, I place it only where I want to focus lights So, I don't have strobes but we will make our own lights in our editing. So, to make it dramatic I usually dim around it first and to do that, just long press here the innermost circle with blue .
In Invert Mask, only the red area will be edited on your adjustments. Because, I want to focus the light inside the circle. What I will do is decrease the exposure to slightly darken its surroundings to make it dramatic the way I want it to my photo sometimes it's not realistic but I really like that look a slightly unreal So, I'm ok with it. But, sometimes I adjust the hadow to complement with the exposure Then, I'm done with it. Of course, we adjusted only the outer area and I want to add more light in the inner area So, we will add another circle. Let's focus it where we want to place it for us to have a second lever of light So, I'll put it in here Then, let's add more exposure So, let's try maybe a bit lower maybe around point Zero Five (0.05) only and Shadow, let's add a bit and then, for our Blacks let's add a little
 |
 |
| Lightroom |
Then, we're okay with it. For me, I'm okay already with it. And, then... If I want to have some adjustments Maybe, I'll play my lights in Exposure. To make it look more dramatic. Because, I always want it to look more dramatic. Though, it's a bit unreal. But... I'm satisfied with that outcome of my photo. So, I think I'm already okay with this. It's a bit fierce for me. So, I think I okay already with this one. So, I'll show you what is it before This is before of our photo and after we edit. So, now we can Export. So, if you'll be exporting photo.. the Three (3) dots above just click it So, usually in.. Instagram and Facebook the highest resolution is..
So, in Lightroom Mobile I choose.. Actually, it's high already. So, we don't have any to choice but to select this. to minimize the quality of the file Then, it will be saved in the device. So, it's okay already. I help you already on how to edit your photos using your mobile phones You can now start editing anywhere even when you're traveling to work just like me I have an hour going to the office. So, I don't waste it.
Because, I can still edit using my mobile phone. And, don't worry if you're just going to release it in social media you don't need a high resolution our phone is enough for editing. Unless, we need to print it out after editing. That will be a separate discussion and we need to edit using a laptop. And, if you have any clarifications. Please just comment below. And, if you have anything in mind that you wish to learn.
 |
That I believe I can help you with to share anything I know .
Thank You for Reading.
For suggestions or Problem 👉
Click on it.







Comments
Post a Comment
Hi ,
Guys I hope you will like my posts and article and you will help me to grow I am also a small user like you so please Help me to grow .